스프링 빈 등록방법 @ComponentScan
@Configuration
@ComponentScan(
        excludeFilters = @ComponentScan.Filter(type = FilterType.ANNOTATION, classes = Configuration.class)
)
public class AutoAppConfig {

}
컴퍼넌트 스캔을 사용하려면 '@ComponentScan'을 설정 정보에 붙여줘야한다.
기존의 AppConfig와는 다르게 @Bean으로 등록한 클래스가없다.
※ 컴퍼넌트 스캔을 사용하려면 '@Configuration'이 붙은 설정 정보도 자동으로 등록되기때문에 AppConfig, TestConfig 등 앞서 만들어두었던 설정정보도 함께 등록된다. 그래서 'excluderFilters' 를 이용해서 설정정보 컴포넌트 스캔 대상에서 제외시켰다.
※ '@Configration' 이 컴포넌트 스캔의 대상이 된 이유는 '@Configration' 소스코드를 열어보면 '@Component' 어노테이션이 붙어있기 때문이다.
@Component라는 어노테이션이 붙은 클래스에 대해 Spring Bean으로 등록한다.
@Component
public class MemoryMemberRepository implements MemberRepository{
@Component
public class RateDiscountPolicy implements DiscountPolicy{
@Component
public class OrderServiceImpl implements OrderService{

    private final MemberRepository memberRepository;
    private final DiscountPolicy discountPolicy;

    @Autowired
    public OrderServiceImpl(MemberRepository memberRepository, DiscountPolicy discountPolicy) {
        this.memberRepository = memberRepository;
        this.discountPolicy = discountPolicy;
    }
@Component
public class MemberServiceImpl implements MemberService{
private final MemberRepository memberRepository;
@Autowired
public MemberServiceImpl(MemberRepository memberRepository) {
this.memberRepository = memberRepository;
}'@Autowired' 를 사용하면 생성자에 여러의존관계도 한번에 주입 할 수 있다.
Test
public class AutoAppConfigTest {

    @Test
    void basicScan(){
        AnnotationConfigApplicationContext ac = new AnnotationConfigApplicationContext(AutoAppConfig.class);

        MemberService memberService = ac.getBean(MemberService.class);
        Assertions.assertThat(memberService).isInstanceOf(MemberService.class);
    }

}
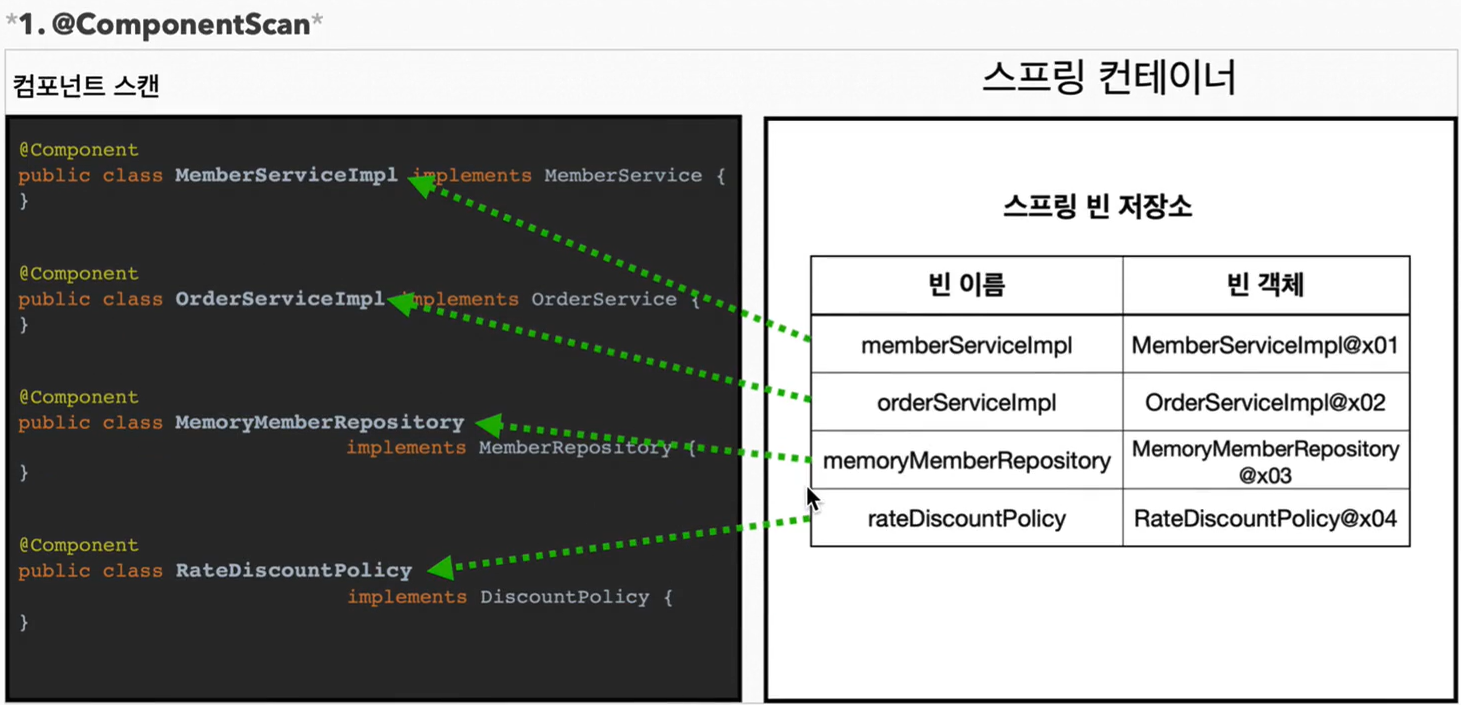
- '@ComponentScan'은 '@component'가 붙은 모든 클래스를 스프링 빈으로 등록한다.
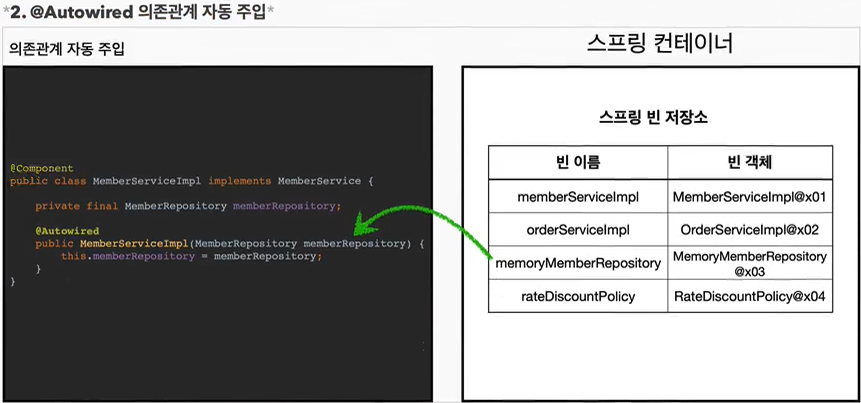
생성자에 '@Autowired'를 지정하면, 스프링 컨테이너가 자동으로 해당 스프링 빈을 찾아서 주입한다.
탐색위치와 기본 스캔 대상
모든 자바 클래스를 다 컴포넌트 스캔하면 시간이 오래걸린다. 그래서 꼭 필요한 위치부터 탐색하도록 시작 위치를 지정 할 수 있다.
@ComponentScan(
        basePackages = "hello.core"
)- 'basePackages' : 탐색할 패키지의 시작위치를 지정, 하위 패키지를 모두 탐색한다.
- 'basePackageClasses' : 지정한 클래스의 패키지를 탐색 시작 위치로 지정한다.
- 만약 지정하지않으면 '@ComponentScan' 이 붙은 설정 정보 클래스이 패키지가 시작위치가 된다.
- 권장방법 : 패키지위치를 지정하지 않고, 설정 정보 클래스의 위치를 프로젝트 최상단에 두는것이다.
※ 스프링 부트를 사용하면 스프링 부트의 대표 시작 정보인 '@SpringBootApplication'를 이 프로젝트 시작루트 위치에 두는것이 관례이다.('@SpringBootApplication' 설정안에 '@ComponentScan'이 들어있다.)
@Target(ElementType.TYPE)
@Retention(RetentionPolicy.RUNTIME)
@Documented
@Inherited
@SpringBootConfiguration
@EnableAutoConfiguration
@ComponentScan(excludeFilters = { @Filter(type = FilterType.CUSTOM, classes = TypeExcludeFilter.class),
      @Filter(type = FilterType.CUSTOM, classes = AutoConfigurationExcludeFilter.class) })
public @interface SpringBootApplication {
컴포넌트 스캔 기본 대상
컴포넌트 스캔은 '@Component'뿐만 아니라 다음과 내용도 추가로 대상에 포함한다.
- '@Component' : 컴포넌트 스캔에서 사용
- '@Controller' : 스프링 MVC 컨트롤러에서 사용
- 스프링 MVC 컨트롤러로 인식
- '@Service' : 스프링 비즈니스 로직에서 사용
- 개발자들이 핵심 비즈니스 로직이 여기있다 인식정도
- '@Repository' : 스프링 데이터 접근 계층에서 사용
- 데이터 계층의 예외를 스프링예외로 변환
- A DB사용시 예외와 B DB예외 사용시 예외는 다르다. 그래서 Spring이 추상적인 예외로 변경 통합시켜준다?
- '@Configuration' : 스프링 설정 정보에서 사용
※ 어노테이션은 상속관계라는 것이 없다. 그래서 이렇게 어노테이션이 특정 어노테이션을 들고 있는 것을 인식 할 수 있는 것은 자바의기능이 아닌 스프링이 지원하는 기능이다.
▶ 가장 궁금했던 점이 풀렸다. 팀 프로젝트 시 Bean에러를 며칠간 해결하기위해 구글링 중 ComponentScan에 대해 알았
지만, 정확한 사용법은 몰랐다. (그당시 Bean등록에러가아닌 entity의 문제였지만..)
▶ 나는 개인프로젝트시 @Controller, @Service, @Repository 의 어노테이션을 주로 사용하였다.